Using a Focusrite 2i2 as a Hardware Send
In this guide, we will show you how to use Focusrite Control with your Scarlett interface. That ways you'll learn how to set upwardly, route, and adjust settings in the app. Follow the sections beneath to go started.
- Navigate Focusrite Command
- Device and Input Settings
- Output Routing
- How to route in Focusrite Control
- Pair iOS device with Focusrite Command
Focusrite Control is the standalone software where yous will make various changes with the Focusrite interfaces. This includes irresolute clock sources, routing, sample charge per unit, and, depending on your device, pairing with your iOS device. When you launch Focusrite Control, there are three windows yous'll be working with. The Output Routing, Input Settings, and Device Settings.
If you launch Focusrite Control and receive an error that says No Hardware Continued, exist sure that the USB cable is fully inserted and that the drivers are installed correctly. If that doesn't work, check out our guides on resolving audio interface bug on PC and Mac.
TIP: Hovering your mouse over any part of the software will show you a clarification of what the office does.
Device and Input Settings
The Input Settings window is straightforward. Unlike other interfaces that apply physical controls, you can perform a variety of basic functions all in the standalone software. These functions include changing the input source between LINE and Instrument, turning the PAD (–10dB) on and off, as well as engaging the AIR preamp for each channel.
Clicking the cog icon will pull up the Device Settings. Within Device Settings, yous will change the sample charge per unit, every bit well as the clock source. You lot tin even change the name of your device and change the colors of the gain halos on the interface. If y'all ain a Scarlett 6i6, 18i8, 18i20, Clarett, or Red model interface, you will also get to the Device Settings window to connect to the Focusrite iOS Control app.
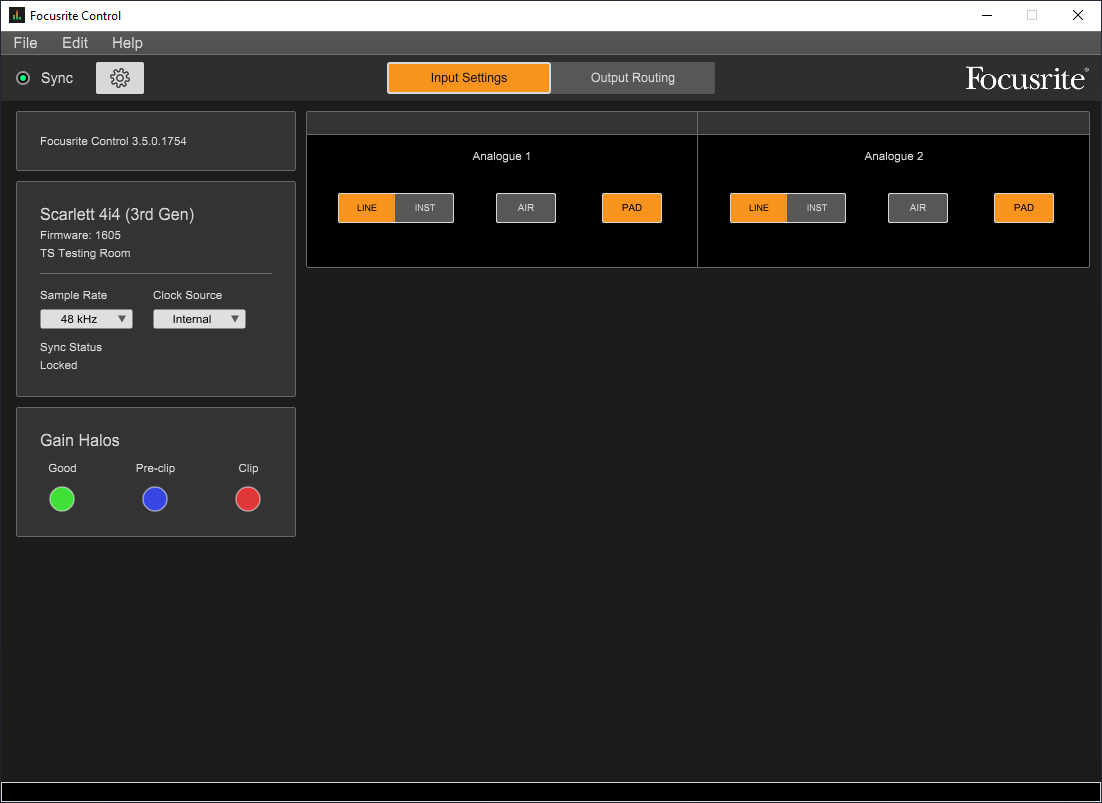
Focusrite Control input settings. Click to enlarge.
The Output Routing window is where yous assign your inputs and outputs to unlike sources. Yous tin can also adapt the panning and signal level of individual inputs and outputs. Information technology's comprised of iii dissever sections — Hardware Inputs, Software (DAW) Playback, and Outputs. To go you lot started, let'south explain each section of the app.
If you e'er need a description of what a detail control does, hover your mouse over it to view a tooltip located at the lesser left of the window.
All available outputs on your Scarlett/Clarett interface are located on the left side of the Focusrite Control window. You're able to give each output a custom name by typing in the box between the Output Source and Output Identifier (east.g., Nearfield Monitors). You have three output routing sources you lot can choose from. Playback (DAW), Analog, and Custom Mix. If Playback (DAW) or Analog is selected, yous volition run across the routing for the selected output.
- Playback (DAW): Signal simply from your DAW software/computer.
- Analog: Indicate merely from hardware inputs (direct monitoring).
- Custom: A combination of both Playback (DAW) and Analog.
When the Output Source is set to Custom Mix, the Hardware Input department will allow y'all to assign whatever of the physical inputs to a specified output. You tin can add Mute/Solo, adjust panning and levels for each private input, which is specially useful when creating custom headphone mixes.
Focusrite Control allows you to add boosted outputs forth with the Master Stereo output. Playback ane-2 is typically your computer'south default Left and Right output. In most cases, this setup is fine. If for example, you wanted click going to your headphone mix though, y'all could assign the metronome to Playback iii-4 in your DAW, then add it to the Custom Mix within the app.
Now that you know how to navigate the Focusrite Control app, permit'south show you how to customize routing. Focusrite Control includes a couple basic routing presets (Snapshots). However, you can e'er create a custom mix from scratch. Creating a custom mix is particularly useful for when you lot're using outboard gear or recording a ring who want individual headphone mixes.
Allow's create a basic custom mix which has two inputs and a straight monitor headphone mix that has vocals and a metronome rail. In this instance, we'll be using a Scarlett 4i4 (tertiary Generation) with a guitar connected to Ch. one and a microphone connected to Ch. 2.
IMPORTANT: When using a sample rate of 176.iv or 192, yous will meet the message "Mixer is disabled at this sample rate". Yous volition be unable to create a custom mix, however yous tin can still road the Hardware Inputs and Software Playback channels direct to the outputs.
- Go to File, navigate to Output Presets, then select Empty. The Hardware Inputs and Software (DAW) Outputs will be removed.
- Click Monitor Outputs one-2 (Speakers icon) to select your Main Outs, then select Custom Mix as the source.
- Click the + in the Hardware Inputs surface area, then select 1 and 2 to create two mono inputs. Adjacent, click in a higher place the channel and label them as Guitar and Microphone.
- Click the + in the Software (DAW) Outputs area, so select 1-2 to route your Chief Outs.
- Click Line Outputs iii-4 (Headphone icon) to select your headphones and ready the source to Custom Mix. Brand sure that the Line Outputs 3-4 box is blackness; not grayness.
- Mute Ch. ane (Guitar) and so adjust the levels of the vocal track.
- Adjusting the level of a Hardware Input channel within Focusrite Command will not affect the signal going into your DAW.
- Enable Outputs three-four within your DAW, so create a metronome rail.
- Assign the metronome track to Outputs 3-four within your DAW.
- Go to Focusrite Control, then click Line Outputs 3-iv (Headphone icon) to select your headphones.
- Click the + in the Software (DAW) Outputs area, then select 3+four. Printing play in your DAW and check the levels in Focusrite Control to make sure you're getting metering on both Software Playback tracks.

Output routing in Focusrite Control. Click to enlarge.
Y'all tin can control Focusrite Control remotely if you own an iOS device. This is a handy tool in recording situations where you lot're in some other room and demand to make adjustments on the fly. Follow these steps to pair your iOS device.
- Download the latest version of Focusrite iOS Control on the App Store.
- Open Focusrite Command on your computer, and launch the iOS app.
- Follow the on-screen instructions to complete pairing.
- Select the computer listed on the iOS app, click Device Settings on the desktop app, then click Approve adjacent to the iOS device listed under Remote Devices.
If your Focusrite interface doesn't appear in the iOS app, it's more than likely an upshot with your WiFi connection. For detailed troubleshooting steps, bank check out Focusrite'southward aid guide.
When you need help, Sweetwater has the answers!
Our noesis base contains over 28,000 expertly written tech articles that will give yous answers and help you get the most out of your gear. Our pro musicians and gear experts update content daily to keep you lot informed and on your way. All-time of all, it's totally Gratis, and it's only some other reason that y'all get more at Sweetwater.com.

0 Response to "Using a Focusrite 2i2 as a Hardware Send"
Post a Comment